Showing posts with label swatch. Show all posts

8 February 2017

GuestPost - Be Happy And Buy Polish

Hi everyone!
Jessica here from Be Happy And Buy Polish. When Dina needed some guest posters for when her baby comes, of course I wanted to help out since I'm also (as of this writing) expecting a baby any day now! Us preggos gotta help each other out. ;)

Femme Fatale Cosmetics Euna cold state, Girly Bits Cosmetics Sep-timber | Be Happy And Buy Polish

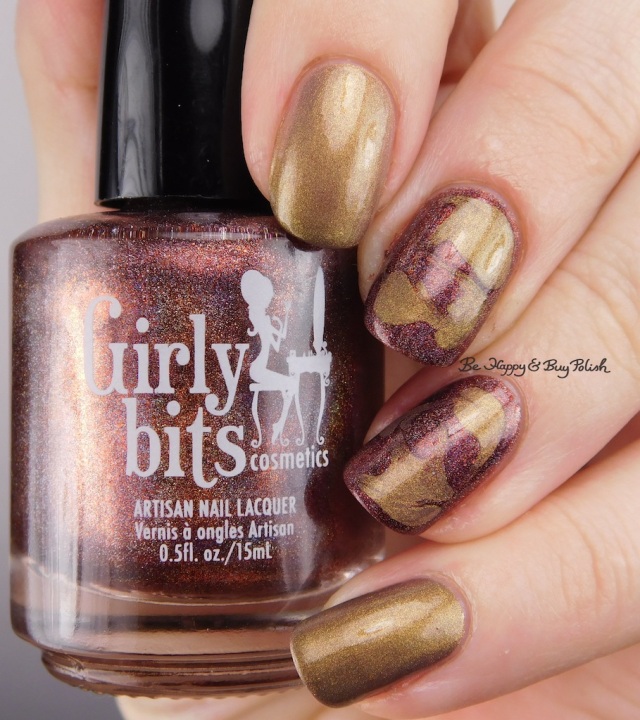
Today I have some nail art featuring Femme Fatale Cosmetics Euna and Girly Bits Cosmetics Sep-timber. I've been watching some of Sveta's Nail Art videos and have wanted to try some drag nail art.

  Femme Fatale Cosmetics Euna transition state, Girly Bits Cosmetics Sep-timber | Be Happy And Buy Polish

Femme Fatale Cosmetics Euna transition state, Girly Bits Cosmetics Sep-timber macro | Be Happy And Buy Polish

 I started with 3 coats of Euna on my pointer and pinky fingers. Euna is a thermal polish that shifts from a pink-beige when warm to brown to olive green when cold. This applies nicely but sheer and dries matte.
    Girly Bits Cosmetics Sep-timber, Femme Fatale Cosmetics Euna | Be Happy And Buy Polish

On my middle and ring fingers, I started with one coat of Sep-timber and let dry. Then I applied a thick coat of Sep-timber and dotted with Euna; working quickly I dragged the dots around.

  Girly Bits Cosmetics Sep-timber, Femme Fatale Cosmetics Euna holographic | Be Happy And Buy Polish


Girly Bits Cosmetics Sep-timber, Femme Fatale Cosmetics Euna holographic macro | Be Happy And Buy Polish

I love that on my ring finger, the dots ended up looking like leaves - which believe me, I did not intend! LOL :) I was just happy this didn't turn out as a hot mess. I hope you enjoyed my guest post today, if you'd like to take a gander at my blog, I regularly post there, on instagram and Facebook.

Thanks for having me, Dina!

1 February 2017

GuestPost - Keely's Nails

FUN Lacquer Shana with Rainbow Connection
Hi everyone!  I'm Keely from Keely's Nails, and thank you to Dina for letting me guest post.  I've got a swatch of a FUN Lacquer collaboration shade made with Rainbow Connection, which is one of a set of three inspired by the cartoon Jem and the Holograms.  This is FUN Lacquer Shana.
FUN Lacquer - Shana with Rainbow Connection

Shana is a purple crelly polish packed with tiny square holographic glitter and irregularly shaped silvery flakes.  In these swatches I used two coats and top coat.  I think that really thin coats show off the glitter in these types of polishes the best, as you can see the glitters peeking through the different layers, and you see much more depth.
FUN Lacquer - Shana with Rainbow Connection

This was a tricky polish to photograph, and it looks a bit more blue here than it does in person. It does dry fractionally darker than the bottle though.
FUN Lacquer - Shana with Rainbow Connection

I love this macro photo! It really shows the shape of the glitters and flakies, and just how many there are.  It's packed!!
Fun Lacquer Shana
I can highly recommend this polish, it's beautiful and definitely attracts compliments.  It would be lovely in the summer too, I can imagine that the sun would make it sparkle so much. Even though my photos aren't totally colour accurate, I think anyone would like this polish.
If you've never tried any FUN Lacquer before, they are a beautiful indie brand from Singapore.  There's always lots of glitter and sparkle in one of these polishes. If you want to see more, have a look at Cepheus and Ursa Major, both inspired by constellations, and made in collaboration with French blogger iParallaxe.

Thank you again for letting me guest post for you Dina!  Good luck with the newest addition to your family.

23 November 2016

KIKO - Magnetic Nail Lacquer - 705 - Emerald Turquoise

One of the things I try to do, as a nail blogger, is to make sure I try out new techniques and types of polishes. When the KIKO - Magnetic Nail Lacquer came out 4-5 years or so back, I bought the ones I could get hold of.

Back then, I was still struggling with brittle nails after having been a nail biter for so long. My nail shape was not the best, and I just didn't have the practice that I have now.
If you want to dive in my archive to the last time I wore a magnet polish, follow this link.


I have seen some brands from Russia come out with magnetic polishes, and it is only a matter of time before others follow. Right?
Do you think magnetic polishes are on the comeback, or is this just a blast from the past?


Today I am going to show you KIKO - Magnetic Nail Lacquer - 705 - Emerald Turquoise, I know this is Discontinued, but I am sure some of you have these buried in your Helmers or nail polish racks/stash, completely forgotten.

Magnetic Nail Lacquer is a 5-free nail polish: it is formulated without adding harsh ingredients such as Toluene, Camphor, DBP, Formaldehyde Resin and Formaldehyde

I used the KIKO - Nail Art Magnet 01 - Stripes for today's look. This was the only Magnet that I managed to find when these first came out, but if you have magnetic polishes the KIKO - Nail Art Magnets are still for sale, just not the magnet polishes...


KIKO - Magnetic Nail Lacquer - 705 - Emerald Turquoise

KIKO - Magnetic blue
KIKO - Magnetic Nail Lacquer - 705 - Emerald Turquoise

I really like how these turned out, so I wanted to do some nail art on top of the base.
I chose Bundlemonster - BM509 to preserve the nautical feel. I used Wet N Wild - Black Creme as stamping polish because I know I can trust it to do a good job.
Sadly, I think I have received a bad plate with this one. First I tried the diamond shape with the anchors - could barely make out the image. Then I tried the trident image - after several attempts I got a decent transfer and used this for my index finger.
For the rest of the nails I used the rope design which was well etched and transferred like a dream. 


KIKO - Magnetic Nail Lacquer - 705 - Emerald Turquoise stamped with Bundlemonster - BM509


6 November 2016

Halloween Nails


A while ago I did a Charlies Nail Art Haul, and for Halloween this year (I know the post is up late), I was wearing the Halloween Wraps from that Haul.

The wraps were easy to apply and adjust to each nail, they had a slight textured surface so I applied two coats of topcoat to seal them in.
I wore this look for 4 days without them falling off. In my book that is a success.


Charlies Nail Art Halloween Wraps

The really cool thing about these wraps is that the skulls and bones actually light up in the dark. The light they emitted never went dull, like some other wraps I have encountered before, which was super awesome.


8 July 2016

Royal Polish - Shining Armor

Very rarely do I go for solid black polish, but this polish from Royal Polish packs just enough of glitter for it to not feel "too black" for me. Being somewhat of an Office-Goth it's a bit strange that I don't like black nail polish, I suppose that I find it all just a bit "too dark" altogether; with black shoes, black pants, black jacket, black stockings... Most of my wardrobe is black, grey or navy after all.

Today I am showing you Royal Polish - Shining Armour.

Royal Polish - Shining Armour has a black jelly base and is packed with round silver glitters, some small and some slightly bigger. It covers completely in 2 coats, thought I did find it to drag a little of the first coat when applying the second coat. With a topcoat over it feels smooth, and sits nice and flat on the nail. When looking at it with the naked eye it almost looks as if there is a grey tinge in the slightly larger silver glitters.

Black jelly silver glitter polish
Royal Polish - Shining Armor


Now that I have gotten accustomed with using UNT peelable basecoat, I am starting to feel more confident in using more glitter polishes from my stash. Left unloved for so long, and finally getting to see the outside of my Helmer.

Since the polish is so packed with glitter it leaves little room to incorporate nail art with it. I wore it for a couple of days, and then decided to change it up and make an accent nail using this polish.

black and silver nail art
OPI - Crown Me Already and  Royal Polish - Shining Armor 
I also added some stamping using Wet n Wild - Black Creme and Moyra - Damask stamping plate.
Love the finished look and I hope you did too!


Black glitter polish
Royal Polish - Shining Armor

9 May 2016

Opulent Essences - Devils Gold

Polish was sent for swatching purposes, but the opinions expressed are solely mine, nothing else to disclaim.
UK indie polish
Opulent Essences - Devils Gold


Devil's Goldan excellent definition for oil considering the problems it is causing
We are living in a fools paradise if we think we can rely on the Devil's Gold forever.
 

Opulent Essences - Devil's Gold while the name might make you think about oil, this not an oil-spill / oil-slick sort of polish, it is a semi sheer black jelly base with golden flakes and smooth glitter. that shifts in green, gold and blurple, a blueish purple.


Opulent Essences is a Vegan Friendly Nail Polish Maker from the UK. Behind the brand is the duo Sharon and Zoe, if you ever have any questions, the girls are lovely to chat with.

Etsy Store
Instagram

Devils Gold 10 ml - 6 £

UK Indie Nail Polish
Opulent Essences - Devils Gold

Today has been super busy with house-hunting, and I found this gorgeous little terrace house close by a park, that I have filled out the paperwork for and applied for.
If I get this place I will get a larger nail polish room, and it does not have to function as a Nail Cave / Spare Bedroom, it will ONLY be for my nail polishes. 

Fingers crossed.


For the picture swatches on the blog here, you can see one coat of Opulent Essences - Devils Gold over Wet n Wild - Black Creme. On the Live Swatch in the video over here, you can see what Opulent Essences - Devils Gold looks like layered over Barry M - Blue Grape, a cobalt blue polish (dupe for YSL - Bleu Majorelle)

Devils Gold Swatches
More color combos for Opulent Essences - Devils Gold


For the nail art today I opted for a simple accent stamping using Moyra - Ornaments plate 03.
I used Sinful Color - Snow Me White for this.


Baroque nail art
Opulent Essences - Devils Gold layered over Wet n Wild - Black Creme with accent Barry M - Blue Grape, Opulent Essences - Devils Gold over and stamped using Sinful Color - Snow Me White and Moyra - Ornaments - 03


Polish was sent for swatching purposes, but the opinions expressed are solely mine, nothing else to disclaim.

8 May 2016

Opulent Essences - Gravity

Polish was sent for swatching purposes, but the opinions expressed are solely mine, nothing else to disclaim.

UK Indie Nail Polish


If you are a regular to my blog you know that my current obsession is with Opulent Essences polishes. They have so many gorgeous polishes, and keeps coming out with new ones. Recently they launched a Game Of Thrones inspired one, and since I live "just around the corner" from where the series is being filmed, I am a fan.

Since I have to move very soon I have put myself on a No-Buy until the living-situation is sorted, and I know that I have an address where I will be able to receive my parcels.


Opulent Essences is a Vegan Friendly Nail Polish Maker from the UK. Behind the brand is the duo Sharon and Zoe, if you ever have any questions, the girls are lovely to chat with.

Etsy Store
Instagram

Gravity 10 ml - 6 £
Gravity  5 ml - 3 £

Opulent Essences - Gravity is s semi-sheer smooth glassfleck polish that shifts between blue and a rich jeweltoned purple. 


Glassfleck polish
Opulent Essences - Gravity

In the swatch above you can see it applied in two coats over Wet n Wild - Black Creme on the index , ring and little finger and on the long finger it is applied over Barry M - Gelly - Blue Grape. 
It also looks good over grey and purple. 


Rose and blue nail art
Opulent Essences - Gravity with Bundlemonster Waterdecals.


I decided to use some waterdecals that I have received in a Surprise Bundle from Bundlemonster, and added some dotticures using my dotting tool to complete the look. I am not sure if it is possible to buy these waterdecals separately, but they are called GID-033.  


Polish was sent for swatching purposes, but the opinions expressed are solely mine, nothing else to disclaim.

5 May 2016

Opulent Essences - Chameleon Red

Polish was sent for swatching purposes, but the opinions expressed are solely mine, nothing else to disclaim.

I just received super sad news. The landlord to the flat that I have been living in for the past year is moving back home, and asked me to leave the flat within the month. I have really loved this flat, and my nailroom was almost perfect. I had recently purchased some curtain fabric to add a splash of colour between all the steel and white wooden furniture that I have here.

So, I have started packing my belongings away in some of the boxes that I had stored. 
I took this mess of boxes as inspiration for today's nail art look. I will get back to that in a minute.


Opulent Essences is a Vegan Friendly Nail Polish Maker from the UK. Behind the brand is the duo Sharon and Zoe, if you ever have any questions, the girls are lovely to chat with.

Etsy Store
Instagram

Chameleon Red 10 ml - 6 £
Chameleon Red 5 ml - 3 £


metallic multichrome polish
Opulent Essences Chameleon Red


Today I am showing you Opulent Essences - Chameleon Red. 
This is a gorgeous metallic multichrome polish. You can clearly see it shift blue, burgundy, and purple. The best trick that I know with these kind of polishes is to use a sponge to apply the second coat, this way you do not end up seeing the brushstrokes and can truly appreciate the gorgeous shift in these polishes.

metallic multichrome polish
Tweezers, a makeup sponge and polish


I recently did a hehe plate haul, and for today's look I used hehe - 001 and Claudia - 154 - Lilac Pink. Claudia - 154 - Lilac Pink is a purple polish with pink shimmer that I got for Christmas by my brother in Sweden. He is so supportive of my hobby, and the bestest brother a girl could ask for. 


hehe001 nail art
Opulent Essences - Chameleon Red stamped using Claudia - 154 . Lilac Pink and stamping plate hehe - 001

Chessboard Nail Art
Opulent Essences - Chameleon Red stamped using Claudia - 154 . Lilac Pink and stamping plate hehe - 001


I love how the pink shimmer in Claudia - 154 . Lilac Pink really brings out the metallic in Opulent Essences - Chameleon Red. Such a lovely combination don't you think?


Polish was sent for swatching purposes, but the opinions expressed are solely mine, nothing else to disclaim.

3 May 2016

Opulent Essences - Fools Gold

Polish was sent for swatching purposes, but the opinions expressed are solely mine,  nothing else to disclaim.

You might have noticed my slight obsession with Opulent Essences lately, and today I am showing you another Opulent Essence polish that landed on my doorstep last week.

As a member of Fantasmic Flakies on Facebook, I thought I would start with a flakie polish.
Opulent Essences - Fools Gold
This is a baby blue polish with a pearl shimmer and golden flakies, in some lights this polish leans a bit teal. This is specially evidently when pairing with black.


Opulent Essences Nail Polish
Opulent Essences - Fools Gold


Opulent Essences is a Vegan Friendly Nail Polish Maker from the UK. Behind the brand is the duo Sharon and Zoe, if you ever have any questions the girls are lovely to chat with, and as far as I know, don't bite. Hehe.

Etsy Store
Instagram

Fools Gold 10 ml - 6 £
Fools Gold 5 ml - 3 £

UK Indie Nail Polish
Opulent Essences - Fools Gold

In the swatches above you see the polish when applied in 3 coats. I did not encounter any problems with this polish, it applied nicely, and the pearl shimmer looks fantastic with the gold flakies.
I also think this polish looks great on me. The shade is just the right kind of blue for my skin at the moment. 

On my Youtube channel I also show how this looks applied over black and cobalt blue polish, if you are feeling adventurous and want to layer it over something else. 
The black polish as an undie makes this lean more teal, which I thought was very interesting. 


I could not leave this polish alone and felt the need to try some nail art using this as a base. 
I pulled out Bundlemonster BMXL204 and Moyra - 05 - Vintage. For the stamping I used Barry M - Gelly - Blue Grape and KIKO - Magnetic - 707.


Fisherman Nail Art
The Lonely Fisherman Nail Art. Using Opulent Essences - Fools Gold, Bundlemonster BMXL204, Moyra - 05 - Vintage, Barry M - Gelly - Blue Grape and KIKO - 707


Polish was sent for swatching purposes, but the opinions expressed are solely mine,  nothing else to disclaim.

28 April 2016

Freckles Polish - I'm the Fairest

Back in November I had purchased a Paint The Rainbow box.
Paint The Rainbow is a monthly box filled with specially made polishes from indie nail polish makers based on a theme that changes every month.

Since I was so busy with my "24 Days Of December" count down to Christmas Day with nail art, I completely forgot about it, and it went unopened for a long time. 

I pulled out the first polish, Freckles Polish - I'm The Fairest. A gorgeous purple glitter polish. Happy with the polish I closed my Pain The Rainbow box and it's been like that since. I still have no idea what the other polishes are...
Next time I want a new polish I can just open the bag. Hehe.

This was a very chunky glitter polish, and I needed to go in with a bit of dabbing to cover any bald spots, but a generously amount of topcoat and it looked divine. 

The following morning I took my suitcase to the shuttle bus to the airport and noticed a chip on my thumb. From there on, the chipping got worse and by the time I had arrived at the birthday party, mere 3 days after I had applied the polish, there was barely anything left.

I spoke to the maker of Freckles Polish about my experience and she kindly offered me a discount to her store, if I was willing to give them another try.
Ended up ordering a couple of polishes from her site, because I believe in giving second chances, and that a first impression does not tell the whole story.

This is not the last you will see from Freckles Polish on my blog. The customer service that I received from her was great, and she was very understanding and easy to talk to. I did not have any problems with chipping on any of the other polishes that I bought from Freckles Polish.


Purple glitter polish
Freckles Polish - I'm the Fairest

Purple glitter polish
Freckles Polish - I'm the Fairest


Check out Freckles Polish Etsy Store over here. 

23 April 2016

Color Club - Barely There

This post contains a "Refer A Friend" link, nothing else to disclose.

Last year I received this polish in my April (?) Glossybox. I blogged about it, and even did a little nail art with some waterdecals from BornPrettyStore. I wasn't wowed by the shade and felt it looked odd against my skin. It was placed in my Helmer, filed under C for Color Club, and I forgot all about it.

Color Club - Barely There


I have been subscribing to Glossybox for well over a year now and I am fairly happy with the service.
Pay 10 £ a month and get sent makeup, lotions, cleaners, face masks and what not, every month, sometimes they even include nail polishes. So far I have received 3 nail polishes, and one of them broke when I was upgrading my storage and adding more shelves to my nail cave.

Collection - 30 - Ice Queen

I could of course go out and replace it, but I am not. I have moved on. 


I had decided to give Color Club - Barely There another chance. 
I have to say I do like it a lot better when my nails are longer, and my skin winter pale. 

What is your favorite nude polish? Do you ever wear them?


Color Club - Barely There


Color Club - Barely There


This post contains a "Refer A Friend" link, nothing else to disclose.

19 April 2016

Opulent Essences - Taste The Rainbow Collection - Blueberry

This is the last polish in the Opulent Essences - Taste The Rainbow Collection. Today I am showing you a nail art look using Opulent Essences - Blueberry.
Or you can check out my Live Swatch and Review:
Live Swatch and Review on the blog.


For this swatch I used 2 coats over one coat of Sinful Color - Snow Me White and UNT - peelable basecoat.  This polish is super glossy and you can actually build it somewhat on it's own to get a darker and more vibrant shade. 
If you choose to wear it without the white undie this will cover perfectly in 3-4 coats.

Opulent Essences - Blueberry Swatch
Opulent Essences - Taste The Rainbow - Blueberry

I decided to switch things up a little for today's post, and instead of just doing some fancy stamping on top I decided to go for a marbled design.
I grabbed a large angled brush for this, and dipped one side in Sinful Color - Snow Me White, and the other in Opulent Essences - Blueberry - like you would when doing a one stroke mani.
I then used the brush to wiggle the polishes across my nails for this marbled look. 

Wiggle, Wiggle. 

Wiggle, Wiggle.

For the matter of documenting I did not use UNT basecoat for this look as I was expecting guests and needed my mani to last a long hiking trip in the mountain, bad weather conditions and the occasional grasping a tree-trunk or rock in order to follow the trail. I wore this look for almost 2 weeks with no chipping. 


Blue drymarble nail art
Marble nails using Opulent Essences - Taste The Rainbow - Blueberry and Sinful Color - Snow Me White.


13 April 2016

Pretty Serious - The Pink One

I thought we would take a little break from all the neon polishes that you have been seeing on the blog lately. While I have been doing awesome stuff with the Taste The Rainbow collection from Opulent Essences, I have been doing some shopping, and the nail mail has given my mailman a good workout. One of those parcels contained this gorgeous polish from Pretty Serious , you might have seen my Halloween manicure using a Pretty Serious polish, and I loved it so much, that I decided to get some more. The choice fell on Pretty Serious - The Pink One.

Pretty Serious - The Pink One

I used 2 coats for this swatch, and you can see just how amazingly bright pink this polish is. The blue shimmer is vibrant and makes this polish very unique. The closest thing that I had in my collection was H&M - Pink, which is probably 6-10 years old by now, and no longer around, but the blue shimmer in Pretty Serious - The Pink One is even more vibrant.

The packaging to the Pretty Serious nail polishes are super cool. Just take a look at this.


Pretty Serious - The Pink One

I could not get myself to do nail art over this polish, but it really is amazing on its own.


A photo posted by Dina Ramse (@secretarysnailart) on

7 April 2016

Opulent Essences - Taste The Rainbow Collection - Orange

Today I am showing you another neon polish from the Taste The Rainbow Collection by Opulent Essence. If you are feeling the tug towards this collection, head over to the Opulent Essences Etsy store. They have so many cool polishes for sale, I am sure you will find one that is right for you.

A huge bonus in my book is that they are Vegan friendly!

You can find a Live Swatch that I did over at my YouTube Channel for the entire collection, by following this link.


UK Indie Nail Polish
Opulent Essences - Taste The Rainbow - Orange

Here you can see Opulent Essences - Taste The Rainbow Collection - Orange applied in 2 coats over 1 coat of Sinful Color - Snow Me White. The swatching stick has one coat.
I wanted to use some of my newer stamping plates, so I grabbed two plates from my Bundlemonster pile. BMXL178 - WORK IT! and BMXL204 - Beaching Nails. 
Let's do some doublestamping again!


doublestamping Bundlemonster BMXL178 - WORK IT! and BMXL204 - Beaching Nails
Opulent Essences - Taste The Rainbow - Orange with doublestamping using Bundlemonster BMXL178 - WORK IT! and BMXL204 - Beaching Nails with Beyu 377 and Wet n Wild - Black Creme

Neon Nail Art
Opulent Essences - Taste The Rainbow - Orange with doublestamping using Bundlemonster BMXL178 - WORK IT! and BMXL204 - Beaching Nails with Beyu 377 and Wet n Wild - Black Creme

For the stamping this time I used a duochrome polish Beyu - 377, I have had it forever and really wanted to use it for something, I think it worked great for this background image. The black from Wet N Wild  against the duochrome gives a nice effect when paired with a neon. 


Little reminder of what it looks like alone.

Opulent Essences - Orange
Opulent Essences - Taste The Rainbow - Orange

5 April 2016

Opulent Essences - Taste The Rainbow Collection - Lemon

The first thing that comes to my mind when someone mentions neon, is a traffic-stopping yellow neon. I have several yellow neons in my collection and not many other neon shades. Why that is, I don't know, but I often feel that you can really tell how good the maker is, and what to expect from the collection, by looking at their yellows.

So today I am showing you Opulent Essences - Taste The Rainbow Collection - Lemon
You can find a Live Swatch that I did over at my YouTube Channel for the entire collection, by following this link.
 

Opulent Essences - Lemon
Opulent Essences - Taste The Rainbow Collection - Lemon

On my swatch you can see 2 coats Opulent Essences - Taste The Rainbow Collection - Lemon, over 1 coat Sinful Color - Snow Me White. On my swatching stick you can see one coat alone.

This really reminds me of those Gel Sharpie Markers, and I think if anyone turned those into a polish, this would be it. Super glossy, high shine, and easy application.

I noticed that the bottles from Opulent Essences has a bit of a shattered look in the middle of the lettering. So I thought, what better than pairing it with a shatter / crackle polish? I pulled them all out of my Helmers and decided to use OPI - Shatter - Super Bass Shatter, and stamp an accent with Bundlemonster BMXL202 using Sally Hansen - 640 - Plum Luck, as it pairs very well with OPI - Shatter - Super Bass Shatter, only difference being that OPI - Shatter - Super Bass Shatter has some glitter specs in it. 


Neon Yellow Nail Art
Opulent Essences - Taste The Rainbow Collection - Lemon with OPI - Shatter - Super Bass Shatter and Sally Hansen - Plum Luck with Bundlemonster BMXL202

The above picture is without topcoat, and the glittery specs in OPI - Shatter - Super Bass Shatter really came out of hiding when topcoat was added, but sadly I also smudged my accent, as it had not been given proper time to dry.


Neon Yellow Nail Art
Opulent Essences - Taste The Rainbow Collection - Lemon with OPI - Shatter - Super Bass Shatter and Sally Hansen - Plum Luck with Bundlemonster BMXL202


When I did the Opulent Essences - Taste The Rainbow - Strawberry and tried using Opulent Essences - Taste The Rainbow - Lemon to stamp with I promised to do a proper stamping test. Below you can see it stamped over Sinful Color - Snow Me White and Wet N Wild - Black Creme. 


Swatching Opulent Essences - Lemon
Stamping test over black and white with Opulent Essences - Taste The Rainbow - Lemon


1 April 2016

Opulent Essences - Taste The Rainbow Collection - Grape

Many of the girls in the nail art community that I talk to almost daily has a love for purple. With this is mind, I am today showing you Opulent Essences - Grape. This neon purple is totally badass, so to soften the edges, I decided to combine it with glitter.

You can find a Live Swatch that I did over at my YouTube Channel for the entire collection, by following this link.

The following swatching picture is taken with one coat over one coat Sinful Color - Snow Me White.

Opulent Essences - Taste The Rainbow - Grape


I had recently purchased OPI - DS Lapis, and wanted to do some stamping with it, I thought this would be the perfect shade to match it up with.

I grabbed my Bundlemonster - Work It! BMXL177 and used the Ballett-work collage and one of the smaller ballerinas on the plate. I used OPI - DS Lapis for the ballerina, and Wet N Wild - Black Creme for the word collage over the ballerina.


Opulent Essences - Taste The Rainbow - Grape stamping done using OPI - DS Lapis and Wet N Wild . Black Creme with Bundlemonster BMXL177.


I showed this nail art to one of my friends who happen to be a ballerina, and she absolutely loved it.

Did this nail art look dance it's way into your heart?

30 March 2016

Opulent Essences - Taste The Rainbow Collection - Strawberry

Opulent Essences - Strawberry has been quite the hit on Instagram. Sharon & Zoe, the girls behind Opulent Essences, even  shared a little video that I had compressed from the Live Swatch that I did over at my YouTube Channel 


I have therefor decided to do a nail art using Opulent Essences - Strawberry first.


Opulent Essences - Strawberry

Whenever I get my hands on a new polish, the first thing I always wonder about is whether or not they stamp. That's why I grabbed Opulent Essences - Lemon and Bundlemonster - ChitChatNails - BMXL202 and BM-219 and tested this theory.

I did not stop to think about what I was stamping on top, I think I should have done that, because I would have realized that stamping neon over neon might not be the smartest idea. Never the less, I did. So that you don't have to.


Opulent Essences - Strawberry  with stamping done using Opulent Essences - Lemon and Bundlemonster ChitChatNails - BMXL202 and BM-219 as accent. 

It was incredibly hard to capture on camera, with the neon stamping on top, to the naked eye, it looked really cool. I decided to change things up a little, to get a nail art look I would be happy with.
I grabbed Barry M - Superdrugs Limited Edition - Yellow and went back over the Opulent Essences - Lemon. I repainted the accent nail and placed some golden studs instead.


Opulent Essences - Strawberry with stamping done using Opulent Essences - Lemon and Barry M - Superdrugs Limited Edition over with Bundlemonster ChitChatNails - BMXL202 and golden studs for accent. 

I am super happy with how this look ended up. The golden studs give this a bit of an edge, and I think it pairs excellent with the stamping image.