Showing posts with label Matte. Show all posts

15 February 2017

GuestPost - Wacie

Fun With Pink and Coral 


Hello, Secretary's Nail Art readers!
I am Stacie from wacie.com, and I am your guest blogger today.
I have mani for you that combines many nail art techniques to create one cohesive mani.

 For this look, I used Essie's Pink Glove Service and Tart Deco, Blue-Eyed Girl Lacquer's Too Close to the Flame, OPI's Live, Love, Carnaval, and a nameless pink glow-in-the-dark polish I got at Rite-Aid. Each nail is topped with Dream Polish's Gem Glam top coat in the Melon Baller scent, and Essie's Matte About You matte top coat.

(The white spots are from the matte top coat)


As I mentioned, I employed many different styles for this mani.
All nails have a gradient done with Pink Glove Service and Tart Deco, but only one, my thumb, has the gradient alone and unfettered. The index finger has a coat of Too Close to the Flame under the gradient, while the pinky has it over the top. The middle two nails have the water marble done with Live, Love, Carnaval and Pink Glove Service. It's harder to see on some nails, but it is there.


Pink Glove Service is the workhorse of this mani, and I chose it because it's so sheer and so neutral that you can barely tell it's there. I definitely recommend a polish like this for everyone.

I used it here for all my negative-space needs, it watermarbles, and it's soft enough to work on every skintone.


Each nail also has a dose of the no-name glow-in-the-dark. I applied it at a different time on each nail, dependent on what nail art was done.
Unfortunately, it wasn't enough to get a really strong glow. I'll definitely use more if I attempt this again.

This photo was taken in complete darkness.


Blue-Eyed Girl Lacquers are sold in their online shop.
You probably already know where to find OPI and Essie.


Thank you so much for guestposting for me Stacie! Be sure to check out her work over at her blog wacie.com. Preparing for life as a new mom is keeping me busy, and I am looking forward to be getting back to blogging and getting the hang of having a baby around.

5 March 2016

Coffee -nails

A product in this post was gifted to me, nothing else to disclose.

If there is not a tea cup next to me, there is a coffee cup. I love coffee, be it coffee scented candles (my favorite at the moment is Reindeer Brew - Peruvian Coffee Beans -03), a lazy latte or an americano in the morning.

I was organizing my stamping plates recently and found some stamping plates that I have not used for a while. The Cookbook Collection from Moyou London was one of these plates.

I filmed the whole process of this nail art, so if you want to have a look at that, hit that play button below. I made an intro for my videos and very excited about that. Hope you like it.


I started out with one coat of Barry M - Matte - Mocha on all nails, on top of that I added a thin layer of Ard As Nails - Vicky, to add a gorgeous shift, and transforms the look from a basic coffee -nails to something a little bit more glam.
When that was all dry I used Essie - Little Brown Dress, my favorite brown polish for stamping. Moyou London - The Cookbook Collection - 03 as an accent, and Moyou London - The Cookbook Collection - 04 for the rest of the nails.

I used my Magic Mask Liquid Latex that I purchased from Nail-Artisan UK. You can see me use it in the video above.

Coffee -nails using Moyou London - The Cookbook Collection 03 and 04 with Barry M - Matte - Mocha, Ard As Nails - Vicky and Essie - Little Brown Dress.

This is not the first time that I have done coffee nails using the Moyou London - The Cookbook Collection, in fact, last year I did these.

Secretary's Nail Art does Coffee -Nails 2015


1 July 2015

Fashion Statement Nails

Every morning I go past a wallpaper shop on my way to work. Sometimes I am inspired by the new strips of wallpaper in the window, and I try to recreate the look on my nails.
This is what I did today.

For this manicure I used two coats of Barry M - Matte - Copa Cabana. I left the middle finger bare, so you can see the base color in all its vibrant glory.
As far as mattes go, this one is insane! It's all coral-y red epikness.

I found the perfect stamping image on the Moyou London - Fashionista - 08, and used Barry M - Gelly - Cardamom for that.


Barry M - Matte - Copa Cabana, stamped with Moyou London - Fashionista - 08 using Barry M - Gelly . Cardamom.

I really love how this turned out, and to me, it looks very High Fashion.


You might have noticed that I have shown a lot of Barry M polishes on my blog lately, and if you are in the US, might have been a bit frustrated that you can't get your hands on these.
Now that my new system is up, I have discovered that a large part of my polishes where in fact untrieds (!), and I have really wanted to use more of them, and not just horde them, ya know.

Barry M happen to be the brand that I had the most untrieds from, so I started there.

I am fast approaching my 400 post (!) it is kinda scary, and also very exciting, as I have blogged on here for 3 years now, and my goal when I started was to do 100 posts a year.
You can say I definitely managed to do that!

Until next time!

27 March 2015

Discrete Flowers

I received this product of my choosing, free of charge for my honest, non-bias review from the Born Pretty Store.

The last manicure I posted was very bold, and had a lot of strong colours. Today I was feeling like I really needed a palate cleanser, and I had the perfect stamping plate for it.

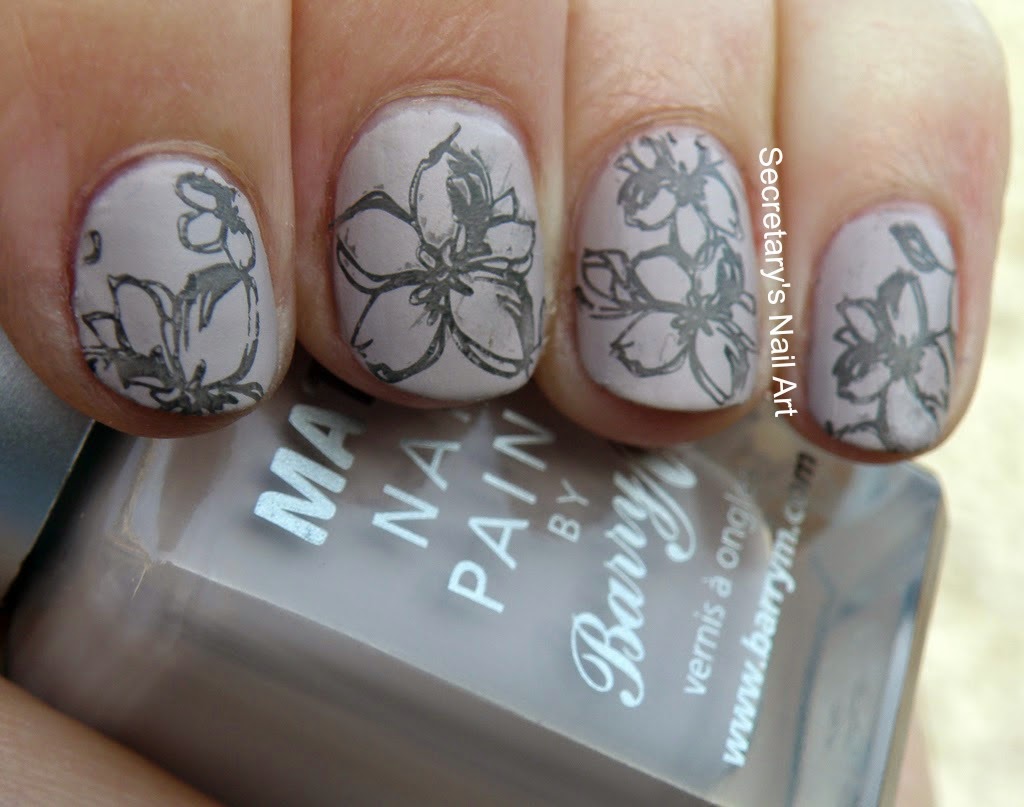
If I must add, the perfect nail polishes for it as well. I recently bought a handful of Barry M polishes in matte, and muted shades.

I started off with two coats of Barry M - Matte - Vanilla. I have to say I love this shade on me, there is just something about this shade that makes me love it. I like the way it looks when it dries. You can capture some shimmer in it, so I took a bunch of pictures to explain what it looks like.

Barry M - Matte - Vanilla

Barry M - Matte - Vanilla

Barry M - Matte - Vanilla

Gorgeous, right?

I then proceeded to take my Born Pretty Store plate Y013 out and my FNUG - Runway.
I wanted to use the flowers on this plate, and leave the fox images for a another day.


Discrete Flower stamp using Y013 stamping plate from Bornprettystore

When I was testing this stamping plate I noticed that the fox images seemed to pick up easier with my firm Konad stamping head better than when I tried using my softer Moyou London stamping head.
So if any of you are having problems with this plate it might be worth trying a firmer stamping head.

You can get Y013 aka Ghost Stories Theme Nail Art Stamp Template Image Plate for 3.99 $ It is squared, and comes with blue protective film, and with a firm stamper, it stamped perfectly well for me.

I love the Fox girl image and the various foxes on this plate, and I am planning on making a Kitsune (Japanese for Fox) nail art, sometime soon.
Couple of years ago I got some Kitsune postcards from a dear friend of mine, and I have really want to make some nail art based on the post cards, using this plate.

Today my inspiration came from a commercial that I saw in Norway for a matte paint for your walls.
So my nails are "Scandinavian Design" -like today


Discrete Flower stamp using Y013 stamping plate from Bornprettystore


If you will be placing an order, feel free to use my 10 % off coupon: RAMG10
There are plenty of products to choose from at their site, not just nail related items, and the prices are very affordable and they have free worldwide shipping.
Click the image below and you will be taken to their site. 


I received this product of my choosing, free of charge for my honest, non-bias review from the Born Pretty Store.

11 April 2014

Golden Nails

I wanted to do some festive nails, Easter Week is almost here. I was struggling with coming up with something to do for a long long time. I got distracted over and over again. Reviews on Youtube, blogs, music, the list was endless on distractions today. The weather was fantastic as well.
I wasn't gonna let myself be beaten.

I decided on using some of the foils I bought at TGR in Norway while I was on my Christmas holiday.
I have already used one of them, and you can see that by clicking here, and here. 
The foil came in a set of 4 and it cost NOK 10 (£1). They don't require foil glue or anything, just a sticky surface. so polish your nails with the base colour you want, wait until it goes tacky and apply the foil. Easy as that.
For the record of all things foil. I used Gina Tricot Basecoat and Topcoat for this manicure, like last time.

This one was a bit tricky, since I had chosen a matte polish as my base colour. Matte polishes dries quicker than ordinary polishes, so the timing was very difficult. I gave it a couple of tries, and nailed it eventually. 

I used two coats of Revlon - Matte - 032 Emerald City, then applied the foil, and finished the look of with applying one coat of Models Own - Dancing Queen. 

I bought the whole collection ages ago, and I think I have only used one of them so far. Very sad, and I am a very bad blogger for it. They are SO pretty to look at, so can't give them away/sell, even though they are still in their protective plastic ... still..


Taken indoor

15 June 2012

Summer Challenge - Ladybirds


As todays challenge, we where going to make Ladybird / Ladybug. So here is my take on the challenge.

For this mani I used NYX Matte - Red, Wet n Wild - Creme Black and Depend - French White ( for the eyes). I finished this mani pretty late so I missed the sun, will see if I can get a better picture with some sunlight tomorrow morning.


Check out the others that participate in the Summer challenge.

Debbie @ The Crumpet - http://thecrumpet.blogspot.co.uk/
Alyssa at Fancy Phalanges - http://fancyphalanges.blogspot.com/ 
Lucie @ Lucy's Stash www.lucysstash.com
Vic @ Glowstars http://glowstars.net
Rychelle @ Colorsplash Nails- http://colorsplashnails.blogspot.com/ 
Missy the Manicured Maniac @ http://melissahenderson95.blogspot.com/
Nayade @ Toxic Vanity http://www.toxicvanity.com