Showing posts with label sponge. Show all posts

2 August 2016

Border and Mosaic Nails

Sometimes I just feel like switching things up a little, and pull out techniques that I haven't used for a while. Since my past two posts on here has been kinda serious, I wanted to lighten up the mood with today's nails.

We are revisiting Border Nails.

I know some people know this style better as Frame Nails, but they are one and the same technique.


For this look I am using three polishes:

H&M - Beige is one of my oldest polishes and I am surprised it is still kicking and hasn't dried all up. It has been with me since the very beginning. No wonder it is also, half empty. 

I actually won FNUG - Love Chic in a competition when FNUG first launched, and I got to choose a couple of shades from their line. Their polishes are amazing, a bit on the pricey side, but the staying power of these babies beats most of my other polishes to the boot. 

W7 - Buff is like the accident polish of this look. I never really liked this particular polish, it is too thin to be worn alone, but it works great for sponging. I think W7 make great polishes but W7- Buff is a dud. 

I also used a thin striping brush and a sponge for this look. 


First I started out with applying one coat of H&M - Beige, and once it was dry I placed 2 drops of H&M - Beige and 3 drops of W7- Buff to my Uber Chic Mat and dipped a sponge in to pick up the two colours. Dab dab dab on to the nails. 
It created a nice washed out marbled look. 

Then I went in with a striping brush and FNUG - Love Chic and framed the nails. 


FNUG - Love Chic Border Nails with H&M - Beige and W7 - Buff sponged in the middle as a washed marble look.

I am still learning to get my lines even with my striping brush, but this is definitely looking a whole better than last years attempts at border nails. 
Practise makes perfect, right?

I wore this look for a couple of days, and decided to switch up up and do Mosaic Nails. 
Grabbing my striping brush again and FNUG - Love Chic, I managed to get a couple days more wear.

FNUG - Love Chic Mosaic Nails with H&M - Beige and W7 - Buff sponged in the middle as a washed marble look.

Which one is your favourite?

4 November 2015

'Ard As Nails - Blaze

I recently discovered Ard As Nails on Google+, so I started looking around for reviews and selected a couple of nail polishes that I wanted to try. Ard As Nails is an Indie (Handmade) Nail Varnish range created by the makers of Soap-Dodger. Their nail polishes are all 5 free, cruelty free and Vegan friendly.

I started chatting to Kat the woman behind it all, and I instantly fell in love with her. Her passion shines through her work, and customer service. So when I finally got my order placed I was very excited to try them out.

Today I have for you Ard As Nails - Blaze, a polish in The Medal Collection.
At the time of writing it is currently not available in the shop.

'Ard As Nails - The Medal Collection - Blaze

'Ard As Nails - The Medal Collection - Blaze


Shown on the pictures are three coats of polish, you could get away with two coats, but I am terrible afraid of VNL (Visible Nail Lines), so I added a third coat to be safe. The first picture shows the polish in natural light, there is a subtle holographic shine to it. When placing my hand in the lightbox with artificial light you can see the holoness a lot better, direct sunlight does that same.

I really like this bronze shade, and love the added holoness to it, I think it makes it stand out from other polishes and makes it unique. Exactly what I was looking for. Uniqueness.

My collection of nail polish is just passing the 500 mark, and the last thing I want is to clip on another swatching stick of a polish looking the same as the others I have.


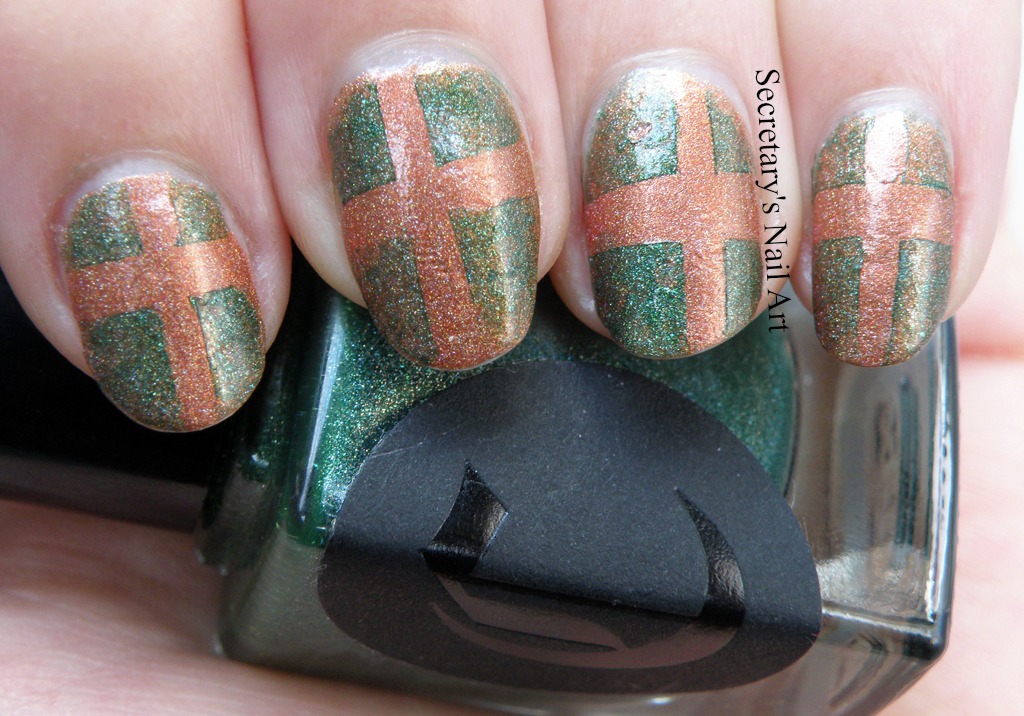
I wanted to do some nail art with this, and ended up placing some tape on my nails and sponge over using Cirque - Josephine. Cirque - Josephine is a gorgeous dark green holographic polish and I just love how those two look paired together.
Makes me wish I had tried to stamp or sponge a gradient with Cirque - Josephine instead.

'Ard As Nails - The Medal Collection - Blaze with Cirque - Josephine

I tried to change up how the crosses looks on my nails, almost like tiny presents waiting to be opened.

If you want to find out more about 'Ard As Nails, you can head over to Ard As Nails Facebook Page, or their shop Soap Dodger .


Feeling ready for Christmas just yet? I am almost done with all the presents, and the city is already filled with Christmas lights.


14 May 2015

HPB Presents: Russian Flowers

I received this product of my own choosing, free of charge for my honest, non-bias review from the Born Pretty Store.

I wanted to join in on the Llama Nails Challenge this month which is: FLOWERS, and at the same time participate on the Hobby Polish Bloggers (HPB) Link-Up this month which is also Flowers. May Flowers. So Two Challenges in one go!
I have been terrible at keeping up with Challenges here and there, but every now and then I like to pick them up and join in.

For this manicure I used four coats of MISA - Russian Sage. I never quiet agreed with this polish. I thought it would be more opaque when I bought it, and I don't really care for VNL, so I wanted to find a way so that I would like to wear this polish. What better than to pull out a sponge and make a gradient(!).

I sponged the tips using Yes Love - 27 - Shiny Glitter. A polish I got while I lived in Spain. It is actually a brand from Portugal, but it was widely available in the shops around Madrid. I never came across this brand on my many trips to Alicante, so it might not be available all around Spain. Just so that is said.

Misa - Russian Sage gradient with Yes Love - 27 - Shiny Glitter. With BornPrettyStore flowers.
I wanted to add some flowers to this, and I received some lovely water decals from BornPrettyStore that I wanted to use for this Challenge.  Purple Floral Butterfly Pattern Sticker T112.

The instructions are pretty simple, take protective film of, soak in water, add decal to nail, remove backing paper, top coat to protect your design. Easy.

The decals comes with a protective film you have to remove. That was not a problem as it was not attached in any way to the paper with the actual decals on them. When I pulled the decals out of the pocket/pack the protective film stayed behind. This did not effect the design in any way.

Like with all water decals, you cut out the pattern you want, drop it in some water and let is sit for a little bit. I was expecting it to be kinda like water tattoos where you put the image on to the surface you want to it go, and then slide the backing paper off.

Notice how my manicure is sporting some white flowers with a purple outline, and some full on purple flowers?

If you used the T112 decals like I described above: that you place them onto your nail (backing paper up, image down), after it was done soaking in water, you would get the white flowers with the purple outline, but you could slide the decal of the backing paper before adding them to your nail.
I found it to be easiest by placing my thumb on the image and slide my index finger down over the backing paper, as the backing paper would follow the index finger and reveal the decal, you could choose which way you wanted them. Purple flowers, or white flowers with purple outline. Since they are different on each side.

On the BornPrettyStore shop you see them as purple flowers, little do you know, that they can actually be both. In my book, that my friends, that is a huge bonus.


T112 from BornPrettyStore.

By having them like this, you can create unique look by mixing and matching the decals on your nails. I really like this feature, and I love the finished result. As you can see from the picture above I was able to overlap two of the designs to make it look continuous, with the vines that goes off the flowers meeting together in a loop at the bottom of my nail.

If you want to get hold of the T112 - Purple Floral Butterfly Pattern it is sold for 2.86 $ but at the time of writing this post, on sale for 2.15 $ .BornPrettyStore offers free shipping worldwide, and if you use my code (RAMG10) you get 10% off your order.


Happy Polishing!


An InLinkz Link-up


I received this product of my own choosing, free of charge for my honest, non-bias review from the Born Pretty Store.

12 January 2015

Leopard prints over gradient

I am sure this don't just happen to me, you sit there with a vision in your head, and when you pick up your stamping plates, you have a plethora of images that could fit the vision, and you have no idea which one to choose (?).

I wanted to do leopard-nails, and when I finally decided on colours to use as background, and grabbed my plate I noticed that I have quite a lot of different ones.

So which one should I choose?

Would I use one of the leopard prints (there are three different ones) from Cheeky - Jumbo plate 9 - Wild At Heart, or CH1?
Would I use the one from Bundlemoster plate BM-221?
Would I use the one from Mash-40?
Would I use the one from my Konad m57?

So I am sitting there with 7 different leopard prints, and I am wondering if I should just freehand them, as I am having a hard time to choose.

While I was thinking hard about what to choose I went and did the sponge gradient I wanted as the background.

I used W7 - Royal and sponged Yes Love - Shiny Glitter - 27 on the tips. Using PVA glue around my nails to make it easier to do the clean up. I am so glad I did, the Yes Love polish was tricky to clean up and I had shimmering particles on my skin for a loooong time after I had the mani removed.


I am sure there are some of you that actually will be able to guess which plate I ended up with here. For the rest of you I can tell you that I used the Cheeky - Jumbo plate 9 - Wild at Heart.

I hope you liked this manicure. It is not like me to do animal prints, but sometimes I am brave and try to embrace the wilder sides of nail art. 

13 April 2014

Want my Bawdy in foil

The title made me giggle, so I had to use it. No I am not going to undergo some weird-ass spa-treatment. It is ofcourse, nail polish related. It's no other than China Glaze - Want My Bawdy, with silver foil over it, and some stamping.

I decided to use some of the foils I bought at TGR in Norway while I was on my Christmas holiday.
I am trying to do a manicure with everyone of these foils. I was asked if they all preformed the same. So why not try them all out (?)
The foil came in a set of 4 and it cost NOK 10 (£1). They don't require foil glue or anything, just a sticky surface. so polish your nails with the base colour you want, wait until it goes tacky and apply the foil. Easy as that. For the record of all things foil. I used Gina Tricot Basecoat and Topcoat for this manicure, like last time.
I have already used the other three from this set, and you can see that by clicking hereherehere, and here
The other reason for doing this combo, was the magical trick I just learned. How to avoid streaks on polishes. It's very simple actually. Sponge the last coat. Why didn't I think of that?!

I also added some nail stamping using Cheeky Jumbo plate 3  European Romance.

I used two coats of China Glaze - Want My Bawdy and then sponged the third coat. When it was tacky I added the foil, and added topcoat before and after stamping. I stamped using Wet n Wild - Black.

I was so proud over how well these swatches turned out, I had to add a few extra pictures of it, last time I tried this polish, I had streaks, and bubbles. However, I must add, the stamping I did last time was gorgeous. You can see the post here. 


Hope you are all having a great start on the Easter Weekend. I will be back soon with some Easter manicures.

10 December 2012

Twinpost: Blow blow up my Blowfish?


This time its CH38, and a blowfish image.
I have to say, this is the funnies I have done so far. I love it.
and I got to try my BO stamping polish from BornPrettyStore.

For this manicure I used:
BO - Olive Green (13)
H&M - Fantasy Ocean
Sinful Color - See you soon
Misa - Toxic Seduction

Forgot to take a picture of the background, sadly.
First I started out with a layer of Toxic Seduction, sponged a bit of Fantasy Ocean, and See you Soon over, to create depth to the background. Then I stamped over using Olive Green.


For those of you, who are interested in how things are going with dating and stuff. Well.

Got this on my door. 

Don't forget to see what Miskha, from Lacquer or Leave Her! did with the image. You can see her post using the same plate as I did, over here. 

27 August 2012

Summer Challenge - Orange and Green

One of the Challenges we recently had in the Crumpet Nail Tarts - FB group, is Orange and Green mani-day.

I started out with three coat of Lemon Tree  from H&M. Took a sponge and dabbed Summer Peach from Sinful Colors over. I used two "coats". Then I took Irish Green from Sinful Colors, and sponged over two times. As a finishing touch, I added wavy french at the very tip.

I have had some questions how I achieve the sponge-look that I also had in my Whiskey Sour mani . So this time, I added a picture of the sponge that I use for this. Just in case its a sponge / using neon - thingy.


20 August 2012

Orange-a-peel with sunspots

I just got my first Indie-polishes, and I had to try Orange-a-peel. It reminds me of a close-up picture of the sun with sunspots. I know I'm a nerd. Haha.
Don´t know what I am on about?

Picture showing AR1339, from National Geographic.
No its not a Claude Monet, this is actually the surface of the Sun. Cool, right?
Anyhow... Back to polish. 

I wanted to to and create something like this with my new polish. 

I used two coats of Depend - 124, and one coat of Orange-a-peel. 


And now for the sunspot effect I sponged some black at the tip and base of my index finger.


Orange-a-peel is a fun polish, I am interested to see how it layers over other colors.
As for drying time. You should not use Out The Door topcoat on this one, after 1 hour it was still gooey. Sally Hansen Double Duty (that I happened to have in my bag), dried it in a few sec. (I have to remember to get a new one soon, cause its almost out. !!)

MSMD - Gradient sponging over nail striping tape mani II

As you might remember I did a Gradient sponging over nail striping tape mani on last monday for the MSMD (Monkey see Monkey do). I loved it so much and wanted to try it out with another set of colors.


Huge thanks to Lacquer or Leave Her for introducing this mani, on her MSMD, a few weeks ago.
If it wasn't for you, I would never have stumbled over this design.
(I wanted to post this mani as soon as she got up, but I haven't seen her yet, so I am just going to do it now. I don't like scheduling posts..)

I finished this mani just around midnight, so I didnt get a chance to take a picture right away, so there will be some wear on it.


13 August 2012

MSMD - Gradient sponging over nail striping tape mani


So this MSMD is actually the fourth in the chain! How cool is that (!?).
I was inspired by Michelle from Laquer or Leave Her!   last monday she did this mani, featuring Misa Fountain Of Youth and Barielle Positive Zen-ergy. Her mani was inspired by Polish Crazed, and her MSMD, on the manicure made by nailXchange, and her Gradient sponging over nail striping tape mani. 
Phuu that`s a lot of polish!


10 August 2012

Summer Challenge - Cocktails

Hi girls, I am so glad its finally weekend!
Its been a long week, for sure.

I have been filing documents, and working in the archive all week, and my cuticles are starting to feel it. I had to swap lotion, and have been using Hemp protector from Body Shop since Wednesday, my hands are just so dry. Usually I don`t swap to the Hemp Protector until winter arrives, but it was needed. They feel a bit better, but they will be needing a lot of love and care.

Tomorrow there is going to be a market, close to where I live. A Farmers Market. I love those. And my favorite supplier of Honey is going to be there, and that's good, cause I am almost all out of my lovely honey. And I would die, without my honey in the morning tea.

So, that's why my manicure today, kinda looks like my Hony-mani, I did last month. haha!
I better stop talking now, before I cry over my empty honey jar.


As Michelle from Lacquer or Leave Her, pointed out, I totally forgot to mention how I achieved this look. 

Polishes:
H&M - Yellow
H&M - Lemon Tree
Sinful Color - Neon Melon
Depend - nr. 124

You need:
a plate/sheet of paper, somewhere to pour  polish.
A makeup sponge.

I started with 5-6 drops of Yellow, dabbing it over the nails from the base and upwards. 
Then 3 drops of Lemon Tree, and went a bit higher up, and focused on getting it on the sides. 
3 large drops of Neon Melon and just dabbing all over.  Going in with 124 and the bald spots, and the tips. Some Yellow at the tips at the end. 

I used the same piece of sponge for all of these steps, I wanted it to look like the "muddiness" you sometimes find in some Whiskey Sours. 

To finish it of, I took the wheel I bought at Claire`s in Spain, with Fimo citrus. 

4 August 2012

Time for Reflection over Tristam

Good morning everyone.
Its time to do some nail art.

Last night I swatched A England - Tristam.


Its sooooo Pretty. 
If you don't want to see me totally transform this polish, into something else, don't read any further. There might be tears.

I grabbed my Time for Reflection -  Essence, and did one coat over Tristam.


Wow! No trace of Tristam left. Totally transformed. Do you like it?

I did some nail art over it, I`m not a fan of how it turned out, but here it is anyway. Who knows, you might like it.


I sponged using Mystic Mauve - Models Own. Then I stamped with BM plate 316, in WnW Black Creme.
It might have looked better without the coat of Time for Reflection - Essence.


23 July 2012

Summer Challenge - Red, Orange, Yellow

Today's challenge, wanted us to use, the colours; red, orange, and yellow.
Wasn't hard to pick shades today, that's for sure. Specially since I only have two yellow (and one is a neon), and one orange, and four reds.

I wanted to have a matte background for this, but the Rimmel Matte, hardly did anything over my Matte Red, and Lemon Tree. Could it be the formula?

Bottleshot!!

For this mani, I painted the nail orange, using H&M - Lemon Tree, then I cut a tiny piece of make-up sponge and used it to apply Matte Red, to the tips.  Lets take a look at that step:


Then I allowed it to dry for a while. I grabbed BM plate - 313, and stamped using H&M - Yellow. Its great for stamping, all the H&M polishes I have tried are ( minis and those with the black cap, special editions, sux at stamping). Can you guess what I was trying to do here?


It`s a beehive with honey!
Or is it just me that can see it?

With Northern Lights holo topcoat