Showing posts with label nail art. Show all posts

8 February 2017

GuestPost - Be Happy And Buy Polish

Hi everyone!
Jessica here from Be Happy And Buy Polish. When Dina needed some guest posters for when her baby comes, of course I wanted to help out since I'm also (as of this writing) expecting a baby any day now! Us preggos gotta help each other out. ;)

Femme Fatale Cosmetics Euna cold state, Girly Bits Cosmetics Sep-timber | Be Happy And Buy Polish

Today I have some nail art featuring Femme Fatale Cosmetics Euna and Girly Bits Cosmetics Sep-timber. I've been watching some of Sveta's Nail Art videos and have wanted to try some drag nail art.

  Femme Fatale Cosmetics Euna transition state, Girly Bits Cosmetics Sep-timber | Be Happy And Buy Polish

Femme Fatale Cosmetics Euna transition state, Girly Bits Cosmetics Sep-timber macro | Be Happy And Buy Polish

 I started with 3 coats of Euna on my pointer and pinky fingers. Euna is a thermal polish that shifts from a pink-beige when warm to brown to olive green when cold. This applies nicely but sheer and dries matte.
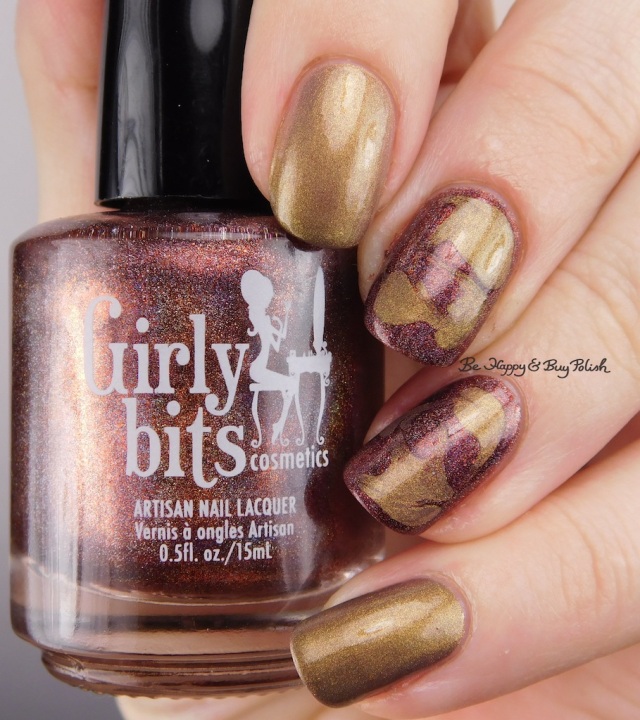
    Girly Bits Cosmetics Sep-timber, Femme Fatale Cosmetics Euna | Be Happy And Buy Polish

On my middle and ring fingers, I started with one coat of Sep-timber and let dry. Then I applied a thick coat of Sep-timber and dotted with Euna; working quickly I dragged the dots around.

  Girly Bits Cosmetics Sep-timber, Femme Fatale Cosmetics Euna holographic | Be Happy And Buy Polish


Girly Bits Cosmetics Sep-timber, Femme Fatale Cosmetics Euna holographic macro | Be Happy And Buy Polish

I love that on my ring finger, the dots ended up looking like leaves - which believe me, I did not intend! LOL :) I was just happy this didn't turn out as a hot mess. I hope you enjoyed my guest post today, if you'd like to take a gander at my blog, I regularly post there, on instagram and Facebook.

Thanks for having me, Dina!

23 November 2016

KIKO - Magnetic Nail Lacquer - 705 - Emerald Turquoise

One of the things I try to do, as a nail blogger, is to make sure I try out new techniques and types of polishes. When the KIKO - Magnetic Nail Lacquer came out 4-5 years or so back, I bought the ones I could get hold of.

Back then, I was still struggling with brittle nails after having been a nail biter for so long. My nail shape was not the best, and I just didn't have the practice that I have now.
If you want to dive in my archive to the last time I wore a magnet polish, follow this link.


I have seen some brands from Russia come out with magnetic polishes, and it is only a matter of time before others follow. Right?
Do you think magnetic polishes are on the comeback, or is this just a blast from the past?


Today I am going to show you KIKO - Magnetic Nail Lacquer - 705 - Emerald Turquoise, I know this is Discontinued, but I am sure some of you have these buried in your Helmers or nail polish racks/stash, completely forgotten.

Magnetic Nail Lacquer is a 5-free nail polish: it is formulated without adding harsh ingredients such as Toluene, Camphor, DBP, Formaldehyde Resin and Formaldehyde

I used the KIKO - Nail Art Magnet 01 - Stripes for today's look. This was the only Magnet that I managed to find when these first came out, but if you have magnetic polishes the KIKO - Nail Art Magnets are still for sale, just not the magnet polishes...


KIKO - Magnetic Nail Lacquer - 705 - Emerald Turquoise

KIKO - Magnetic blue
KIKO - Magnetic Nail Lacquer - 705 - Emerald Turquoise

I really like how these turned out, so I wanted to do some nail art on top of the base.
I chose Bundlemonster - BM509 to preserve the nautical feel. I used Wet N Wild - Black Creme as stamping polish because I know I can trust it to do a good job.
Sadly, I think I have received a bad plate with this one. First I tried the diamond shape with the anchors - could barely make out the image. Then I tried the trident image - after several attempts I got a decent transfer and used this for my index finger.
For the rest of the nails I used the rope design which was well etched and transferred like a dream. 


KIKO - Magnetic Nail Lacquer - 705 - Emerald Turquoise stamped with Bundlemonster - BM509


2 August 2016

Border and Mosaic Nails

Sometimes I just feel like switching things up a little, and pull out techniques that I haven't used for a while. Since my past two posts on here has been kinda serious, I wanted to lighten up the mood with today's nails.

We are revisiting Border Nails.

I know some people know this style better as Frame Nails, but they are one and the same technique.


For this look I am using three polishes:

H&M - Beige is one of my oldest polishes and I am surprised it is still kicking and hasn't dried all up. It has been with me since the very beginning. No wonder it is also, half empty. 

I actually won FNUG - Love Chic in a competition when FNUG first launched, and I got to choose a couple of shades from their line. Their polishes are amazing, a bit on the pricey side, but the staying power of these babies beats most of my other polishes to the boot. 

W7 - Buff is like the accident polish of this look. I never really liked this particular polish, it is too thin to be worn alone, but it works great for sponging. I think W7 make great polishes but W7- Buff is a dud. 

I also used a thin striping brush and a sponge for this look. 


First I started out with applying one coat of H&M - Beige, and once it was dry I placed 2 drops of H&M - Beige and 3 drops of W7- Buff to my Uber Chic Mat and dipped a sponge in to pick up the two colours. Dab dab dab on to the nails. 
It created a nice washed out marbled look. 

Then I went in with a striping brush and FNUG - Love Chic and framed the nails. 


FNUG - Love Chic Border Nails with H&M - Beige and W7 - Buff sponged in the middle as a washed marble look.

I am still learning to get my lines even with my striping brush, but this is definitely looking a whole better than last years attempts at border nails. 
Practise makes perfect, right?

I wore this look for a couple of days, and decided to switch up up and do Mosaic Nails. 
Grabbing my striping brush again and FNUG - Love Chic, I managed to get a couple days more wear.

FNUG - Love Chic Mosaic Nails with H&M - Beige and W7 - Buff sponged in the middle as a washed marble look.

Which one is your favourite?

5 May 2016

Opulent Essences - Chameleon Red

Polish was sent for swatching purposes, but the opinions expressed are solely mine, nothing else to disclaim.

I just received super sad news. The landlord to the flat that I have been living in for the past year is moving back home, and asked me to leave the flat within the month. I have really loved this flat, and my nailroom was almost perfect. I had recently purchased some curtain fabric to add a splash of colour between all the steel and white wooden furniture that I have here.

So, I have started packing my belongings away in some of the boxes that I had stored. 
I took this mess of boxes as inspiration for today's nail art look. I will get back to that in a minute.


Opulent Essences is a Vegan Friendly Nail Polish Maker from the UK. Behind the brand is the duo Sharon and Zoe, if you ever have any questions, the girls are lovely to chat with.

Etsy Store
Instagram

Chameleon Red 10 ml - 6 £
Chameleon Red 5 ml - 3 £


metallic multichrome polish
Opulent Essences Chameleon Red


Today I am showing you Opulent Essences - Chameleon Red. 
This is a gorgeous metallic multichrome polish. You can clearly see it shift blue, burgundy, and purple. The best trick that I know with these kind of polishes is to use a sponge to apply the second coat, this way you do not end up seeing the brushstrokes and can truly appreciate the gorgeous shift in these polishes.

metallic multichrome polish
Tweezers, a makeup sponge and polish


I recently did a hehe plate haul, and for today's look I used hehe - 001 and Claudia - 154 - Lilac Pink. Claudia - 154 - Lilac Pink is a purple polish with pink shimmer that I got for Christmas by my brother in Sweden. He is so supportive of my hobby, and the bestest brother a girl could ask for. 


hehe001 nail art
Opulent Essences - Chameleon Red stamped using Claudia - 154 . Lilac Pink and stamping plate hehe - 001

Chessboard Nail Art
Opulent Essences - Chameleon Red stamped using Claudia - 154 . Lilac Pink and stamping plate hehe - 001


I love how the pink shimmer in Claudia - 154 . Lilac Pink really brings out the metallic in Opulent Essences - Chameleon Red. Such a lovely combination don't you think?


Polish was sent for swatching purposes, but the opinions expressed are solely mine, nothing else to disclaim.

19 April 2016

Opulent Essences - Taste The Rainbow Collection - Blueberry

This is the last polish in the Opulent Essences - Taste The Rainbow Collection. Today I am showing you a nail art look using Opulent Essences - Blueberry.
Or you can check out my Live Swatch and Review:
Live Swatch and Review on the blog.


For this swatch I used 2 coats over one coat of Sinful Color - Snow Me White and UNT - peelable basecoat.  This polish is super glossy and you can actually build it somewhat on it's own to get a darker and more vibrant shade. 
If you choose to wear it without the white undie this will cover perfectly in 3-4 coats.

Opulent Essences - Blueberry Swatch
Opulent Essences - Taste The Rainbow - Blueberry

I decided to switch things up a little for today's post, and instead of just doing some fancy stamping on top I decided to go for a marbled design.
I grabbed a large angled brush for this, and dipped one side in Sinful Color - Snow Me White, and the other in Opulent Essences - Blueberry - like you would when doing a one stroke mani.
I then used the brush to wiggle the polishes across my nails for this marbled look. 

Wiggle, Wiggle. 

Wiggle, Wiggle.

For the matter of documenting I did not use UNT basecoat for this look as I was expecting guests and needed my mani to last a long hiking trip in the mountain, bad weather conditions and the occasional grasping a tree-trunk or rock in order to follow the trail. I wore this look for almost 2 weeks with no chipping. 


Blue drymarble nail art
Marble nails using Opulent Essences - Taste The Rainbow - Blueberry and Sinful Color - Snow Me White.


7 April 2016

Opulent Essences - Taste The Rainbow Collection - Orange

Today I am showing you another neon polish from the Taste The Rainbow Collection by Opulent Essence. If you are feeling the tug towards this collection, head over to the Opulent Essences Etsy store. They have so many cool polishes for sale, I am sure you will find one that is right for you.

A huge bonus in my book is that they are Vegan friendly!

You can find a Live Swatch that I did over at my YouTube Channel for the entire collection, by following this link.


UK Indie Nail Polish
Opulent Essences - Taste The Rainbow - Orange

Here you can see Opulent Essences - Taste The Rainbow Collection - Orange applied in 2 coats over 1 coat of Sinful Color - Snow Me White. The swatching stick has one coat.
I wanted to use some of my newer stamping plates, so I grabbed two plates from my Bundlemonster pile. BMXL178 - WORK IT! and BMXL204 - Beaching Nails. 
Let's do some doublestamping again!


doublestamping Bundlemonster BMXL178 - WORK IT! and BMXL204 - Beaching Nails
Opulent Essences - Taste The Rainbow - Orange with doublestamping using Bundlemonster BMXL178 - WORK IT! and BMXL204 - Beaching Nails with Beyu 377 and Wet n Wild - Black Creme

Neon Nail Art
Opulent Essences - Taste The Rainbow - Orange with doublestamping using Bundlemonster BMXL178 - WORK IT! and BMXL204 - Beaching Nails with Beyu 377 and Wet n Wild - Black Creme

For the stamping this time I used a duochrome polish Beyu - 377, I have had it forever and really wanted to use it for something, I think it worked great for this background image. The black from Wet N Wild  against the duochrome gives a nice effect when paired with a neon. 


Little reminder of what it looks like alone.

Opulent Essences - Orange
Opulent Essences - Taste The Rainbow - Orange

5 April 2016

Opulent Essences - Taste The Rainbow Collection - Lemon

The first thing that comes to my mind when someone mentions neon, is a traffic-stopping yellow neon. I have several yellow neons in my collection and not many other neon shades. Why that is, I don't know, but I often feel that you can really tell how good the maker is, and what to expect from the collection, by looking at their yellows.

So today I am showing you Opulent Essences - Taste The Rainbow Collection - Lemon
You can find a Live Swatch that I did over at my YouTube Channel for the entire collection, by following this link.
 

Opulent Essences - Lemon
Opulent Essences - Taste The Rainbow Collection - Lemon

On my swatch you can see 2 coats Opulent Essences - Taste The Rainbow Collection - Lemon, over 1 coat Sinful Color - Snow Me White. On my swatching stick you can see one coat alone.

This really reminds me of those Gel Sharpie Markers, and I think if anyone turned those into a polish, this would be it. Super glossy, high shine, and easy application.

I noticed that the bottles from Opulent Essences has a bit of a shattered look in the middle of the lettering. So I thought, what better than pairing it with a shatter / crackle polish? I pulled them all out of my Helmers and decided to use OPI - Shatter - Super Bass Shatter, and stamp an accent with Bundlemonster BMXL202 using Sally Hansen - 640 - Plum Luck, as it pairs very well with OPI - Shatter - Super Bass Shatter, only difference being that OPI - Shatter - Super Bass Shatter has some glitter specs in it. 


Neon Yellow Nail Art
Opulent Essences - Taste The Rainbow Collection - Lemon with OPI - Shatter - Super Bass Shatter and Sally Hansen - Plum Luck with Bundlemonster BMXL202

The above picture is without topcoat, and the glittery specs in OPI - Shatter - Super Bass Shatter really came out of hiding when topcoat was added, but sadly I also smudged my accent, as it had not been given proper time to dry.


Neon Yellow Nail Art
Opulent Essences - Taste The Rainbow Collection - Lemon with OPI - Shatter - Super Bass Shatter and Sally Hansen - Plum Luck with Bundlemonster BMXL202


When I did the Opulent Essences - Taste The Rainbow - Strawberry and tried using Opulent Essences - Taste The Rainbow - Lemon to stamp with I promised to do a proper stamping test. Below you can see it stamped over Sinful Color - Snow Me White and Wet N Wild - Black Creme. 


Swatching Opulent Essences - Lemon
Stamping test over black and white with Opulent Essences - Taste The Rainbow - Lemon


1 April 2016

Opulent Essences - Taste The Rainbow Collection - Grape

Many of the girls in the nail art community that I talk to almost daily has a love for purple. With this is mind, I am today showing you Opulent Essences - Grape. This neon purple is totally badass, so to soften the edges, I decided to combine it with glitter.

You can find a Live Swatch that I did over at my YouTube Channel for the entire collection, by following this link.

The following swatching picture is taken with one coat over one coat Sinful Color - Snow Me White.

Opulent Essences - Taste The Rainbow - Grape


I had recently purchased OPI - DS Lapis, and wanted to do some stamping with it, I thought this would be the perfect shade to match it up with.

I grabbed my Bundlemonster - Work It! BMXL177 and used the Ballett-work collage and one of the smaller ballerinas on the plate. I used OPI - DS Lapis for the ballerina, and Wet N Wild - Black Creme for the word collage over the ballerina.


Opulent Essences - Taste The Rainbow - Grape stamping done using OPI - DS Lapis and Wet N Wild . Black Creme with Bundlemonster BMXL177.


I showed this nail art to one of my friends who happen to be a ballerina, and she absolutely loved it.

Did this nail art look dance it's way into your heart?

14 March 2016

Ard As Nails - Kitty's Secret

Ard As Nails - The Bookouture Girls - Kitty's Secret

Ard As Nails is a 5-free, cruelty free, EU Approved Indie nail polish brand here in the UK.


I decided to put up the Extended Version of the live swatch up on Youtube. It seems as if Kitty's Secret was a favorite among many, so I decided to do a nail art look using this polish.

After a lot of thinking, going back 'n' forth on my stamping plates, I decided to use my MJ JV-2 stamping plate. Since the polish comes from a Book inspired collection and the name of the polish was Kitty's Secret I wanted to come up with something that played on that. This stamping plate had the perfect image.

Kitty's Secret is that her Guilty Pleasure is reading 50 Shades of Grey...


Ard As Nails - The Bookouture Girls - Kitty's Secret - MJ JV-2 stamping plate using Barry M - Chai

Ard As Nails - The Bookouture Girls - Kitty's Secret - MJ JV-2 stamping plate using Barry M - Chai


What is your Guilty Pleasure?

8 March 2016

Moyou London - Cookbook Collection 3&4


I have done a little video with a comparison of the Moyou London - The Cookbook Collection 03 and Moyou London - The Cookbook Collection 04. They are a little different in terms of setup and size of the different images.

If you rock nubbins all year around, and like the smaller images, having only Moyou London - The Cookbook Collection 04 is probably the best, but if you have a bit longer nails than that, I would suggest having a look at both of the plates and see which one would fit you the most.

Size:
Moyou London - The Cookbook Collection 03 H2 cm W1.5cm
Moyou London - The Cookbook Collection 04 H1.5cm W1.2cm

If you are anything like me, who loves coffee and coffee related nails, it is worth it to have both plates.


Nail Art Ideas


Smoosh base coffee nails

Glitter base coffee nails

Shimmery base coffee nails


If you are looking to buy some plates from Moyou London, I have put together this little short promo with the nail arts that I have done using various Moyou London stamping plates


6 March 2016

Femme Fatale - Librarian's Shush

A while ago I purchased a holder for my large rectangular stamping plates. This meant that I had to un-sleeve all my Moyou London, and BornPrettyStore plates, as well as taking my Bundlemonster plates out of the box that I have been using for all my plates.

It was time to organize them.

After I had gone through all the plates and placed them in alphabetic order in the holder (of course, I am a Secretary after all), I noticed that some of my plates had been left unloved for quite some time.
I decided to fuse together my two biggest loves here in this world.

Libraries and Coffee.

With Femme Fatale - Librarian's Shush on my nails I was looking for the perfect image on my plates to go with it.
I fell in love with the coffee-drinking-lady on the Moyou London - The Cookbook Collection - 04 that I recently did a review of on my Youtube Channel. 
It brings me back to my days at high school drinking coffee and volunteer my spare hours during the day at the library. I have some great memories from that place, and me and the librarian there would spend hours talking about anthologies, discuss how books fit in the Dewy system, and which Harry Potter book was the best.

I started out with 2 coats of Femme Fatale - Librarian's Shush, I did have to correct the placement of the glitters some to make sure they where actually on my nails, and not everywhere else, but the formula was excellent and it looks quite unique on the nails.


Femme Fatale - Librarian's Shush

Femme Fatale - Librarian's Shush with Moyou London - The Cookbook Collection  04


2 March 2016

PomPomNails

If you follow me on Instagram you might have seen this design before. I was eagerly snapping pictures of the finished look and decided to share a little.


St.Patrick's day is around the corner and some of us are already trying to find the perfect green for our nails. I thought I would help out a little and show you a bit of nail art that would be Perfect for St.Patrick's Day. After all, I live in Northern Ireland, so I should know, right?

Grab your tea, a green polish and some green pompoms.

I purchased a bag of 140 pompoms at Poundland for 1£ so this is a nail art that won't break the bank.
Loads of fun for the whole family, and if you have some left over, you can sew them on your T-shirt and voila you got your costume and nails ready for the big day.

I started out with 1 coat of Barry M - Cardamom. I wanted a green that is close the the clovers I can find outside, and this one seems to be a perfect match.
Once your nails are completely dry apply topcoat like normal and have some tea while they dry completely.
For this nail art it is very important that the nails are dry because the next step is to glue on the pompoms.
Take your pompoms out of the bag and roll them lightly between your palms to get them to fluff up.
Apply some nail glue to the base of your nail just above your cuticle and place the pompoms over and told while the glue dries before moving on to the next one.
Depending on your nail length, you can apply the pompoms to the middle of your nail bed, if you have longer nails the nail polish will still show, and the pompoms will have more to adhere to.


PomPomNails using PomPoms and Barry M - Cardamom

Finish your tea and rock some St.Patrick's Nails. Swap with a yellow or white polish and yellow pompoms for an Easter Nail Art look.

15 February 2016

OPI - ColorPaints

If you follow me on Instagram, you might have seen a sneak peak of this look already. I had recently picked up some OPI ColorPaints at TK MAXX. I got the OPI - ColorPaints - Chromatic Orange and OPI - ColorPaints - Purple Perspective. Eagerly tried them out.


I'm just starting to get the hang of Instagram, I am sure you will see lot more fun from me there.


For this look I started out with Barry M - Gelly - Cream Soda.  

On my Uber Chic Beauty stamping mat I took a bit of  OPI - ColorPaints - Chromatic Orange and OPI - ColorPaints - Purple Perspective and marbled them together, and pressed a stamper over the marble. I allowed it to dry on the stamping mat as well at that on the stamper head and applied a coat of Out the Door topcoat.  After the decals had dried I applied them to my nails and left one finger as an accent.

The little finger did not turn out quite how I had hoped, but I still think it's a fun look.


Barry M - Cream Soda, marbled nail art using 
OPI - ColorPaints - Chromatic Orange and OPI - ColorPaints - Purple Perspective


I quite like the idea of these ColorPaints, and will be cool to see what other looks I can pull together with these.

12 February 2016

Pretty Serious Wired Nails

Today I have for you another Wired Nails look, you might have seen my previous Wired Nail designs, if not here is a handy link for you.

  1. Speedy Wired Nails
  2. Wired Nails

To make Wired Nails you need a sandwich bag or something similar to make decals on. If you got the Über Chic Beauty stamping mat, then count yourself luck and use that. You also need a dotting tool and some nail polish. 


If you are wondering why you have not seen the Red Wired Nails design that I did in this video, on my blog. Then I can tell you that Wine and filming nail art tutorials is just asking for problems. No Wine or Polish was spilled while filming this video, but mistakes were made.

Today I did the Wired Nail look using Barry M - Cardamom. I got away with only one coat so very happy about that. I think I got pretty much the entire Barry M - Gelly line now. They are quickly outgrowing their A - B drawer in my Helmer. If it continues like this, I will have to move out A and use the drawer for B only.

Barry M - Cardamom


Wired Nails using Barry M - Gelly - Cardamom and Pretty Serious - Nightopia

I really like this technique and it is something you don't see around very often which is cool. So easy to do and creates a unique look.
What do you think about Wired Nails?


13 January 2016

Cult Nails - Coveted

Major lemming today girls.


urbandictionary

Long, long time ago there was a company called Cult Nails. They had gorgeous nail polishes, but is no longer around. Ever since I moved back to the UK after I had been in Spain, I have been keeping my eye out for Nail Polish Sales posts on various platforms.

It has payed off, as I have managed to get hold on some lemmings of mine. This time I managed to get my talons on Cult Nails - Coveted.

It is EVERYTHING I hoped it would be. I am so so happy with it.


Cult Nails - Coveted

I recently bought a jelly stamper from BornPrettyStore and I wanted to see if I would do better at lining up stamps with the jelly stamper than I am with my normal XL stamper. As you can see by the result below, I did not do the best of a job on lining it up perfectly with my nails.
It was my first attempt, so I still might need some more practice to get it right. 
I did noticed that it was a little hard to see through the jelly stamper when trying to line it up with my cuticles and nail tips, so if you have one on the way, I would suggest making sure you are in a well lit room. My ceiling lamp was not enough.
If you have the Original Jelly Stamper, or any other Brands with a jelly stamper I am curious to know how they worked for you.
Leave me a comment and let me know.


Cult Nails - Coveted stamped using China Glaze - Midnight Kiss and Bundlemonster WORK IT! - BMXL175

I stamped using China Glaze - Midnight Kiss and Bundlemonster WORK IT! - BMXL175
(a full review on that plate is in the making).

16 December 2015

MSMD - Christmas Baubles

Today I have for you a MSMD - Monkey See, Monkey Do I don't know how long it is since last time I did one of these, but I am sure it has been a couple of years now.
So I am bringing it back!

Today I am recreating Celeste Laureen's Christmas Ornament Designs from 2013, she recently recreated it herself, and you can find that over at her Instagram page.  Apparently her original design had been stolen and someone had cropped out her watermark and spread it all over Pinterest with another watermark. Shame on them.
Someone on PAA was asking who it belonged to and I was able to direct them to the rightful owner.

I liked the design so much I decided to recreate it myself.
Celeste Laureen used Essie - Bobbing For Baubles, and even though I have that polish I decided to use a lighter background colour for this.
'Ard As Nails - Mauve. This polish doesn't actually have that name, as it was a Custom Polish, but as it is a mauve shade, more specifically #B784A7 aka Opera Mauve. I am going to call this polish; Mauve for future reference.

It will make it easier for to me keep order in my stash.

On the nails you can see 2 coats of  'Ard As Nails - Mauve you could easily get away with one coat, but the after effects of my sugar craze yesterday has left me a bit shaky, so I needed a second coat. This polish is absolutely amazing, and it wears like iron on me. It has a subtle shimmer/holoness to it, and the shade is just the perfect work appropriate polish.


'Ard As Nails - Mauve 


Then I grabbed China Glaze -Mistletoe Kisses, China Glaze - Ruby Pumps, China Glaze - Midnight Kiss, and OPI - Moonraker, as well as a striper brush and Wet N Wild - Black Creme. I made large round circles with the polishes and traced around the baubles.


'Ard As Nails - Mauve with Christmas Baubles using  China Glaze -Mistletoe Kisses, China Glaze - Ruby Pumps, China Glaze - Midnight Kiss, and OPI - Moonraker


I hope you liked this look, be sure to follow me on the blog, Facebook, or Google + for more Christmas nail art designs.

For more Christmas themed nails check out my other designs here.

8 December 2015

Shooting Stars


Today I have some nudes for you.
We are not talking about the aftermath of a Christmas Company Dinner going wrong here, but of today's nail art that I did for my little Advent Calendar here on the blog.
One new post every day until December 25th.

For more Christmas themed nails check out my other designs here.

Yesterday I did a bright red look with cute hearts, and today I am toning it down a little with a nude polish and some gold nail art stickers. I am really trying to cater to everyone's taste  this holiday season.

This time I am back with a polish that I got in my Ciate Advent Calendar, this one was hiding behind door number 4. Ciate - Members only. This polish is very similar to Ciate - Ivory Queen, only difference is that Ciate - Members only is even sheerer. We are talking topper sort of sheerness in this one.  On my nails you will see 3 coats.

To finish the look I applied Christmas Stickers from BornPrettyStore in Gold, from the TY103 section of the sheet. In my initial post I was complaining about some bleeding that I discovered, and that was not the case with this look, which I am very glad for.


Ciate - Members only and BornPrettyStore stickers in TY103


This would actually work really well for a New Year look.

For more Christmas themed nails check out my other designs here.

Products in this post has previously been sent for reviewing purposes, to view the original post, follow this link.

22 November 2015

Pancreatic Cancer Awareness

A nail polish in this post was gifted to me, nothing else to disclose.

I dedicate this post to every person that is a survivor, going through this battle of Pancreatic Cancer.
If you want to see my first post about Pancreatic Cancer, you can see that post here.

Pancreatic cancer begins when abnormal cells in the pancreas grow out of control and form a tumor. The symptoms associated with pancreatic cancer are often vague, similar to symptoms caused by other conditions and may not be present in early stages of the disease. To learn more about pancreatic cancer symptoms, types of pancreatic cancer, diagnosis, treatments and more click on the link.

All my blog-income for November month was donated to Pancreatic Cancer Research Fund.
Every little help. In total we raised £6.25.


'Ard As Nails - Little Legs

I am over the moon happy with how 'Ard As Nails - Little Legs looks on my nails. I usually have a dislike to all things pink, but this polish is not one of them. The holographic in this is what I would call "of medium strength", and looks amazing. I wore this polish for 5 days, and not a single chip (!). It survived house-cleaning, laundry, and a wet night out on the pub.

Paint me impressed.

Ard As Nails is an Indie (Handmade) Nail Varnish range created by the makers of Soap-Dodger. Their nail polishes are all 5 free, cruelty free and Vegan friendly.

'Ard As Nails - Little Legs is a part of the Here Come The Boys Collection, and a 4.5ml bottle sells for 3.50 £ and 15ml bottle for 6.50 £.
As you can see I got the mini bottle on the picture above, 2 coats.

But who am I to not put nail art on this, after all I am Secretary's Nail Art, right?

I wanted to raise awareness for Pancreatic Cancer this month, so I paired this gorgeous polish with some stamps from Uber Chic Beauty collection 3-01 using Barry M - Berry Cosmo.

A Purple Ribbon for Pancreatic Cancer

Pancreatic Cancer Awareness using Uber Chic stamping plate, 'Ard As Nails - Little Legs, and Barry M - Berry Cosmo


If you want to find out more about 'Ard As Nails, you can head over to Ard As Nails Facebook Page, or their shop; Soap Dodger .

A nail polish in this post was gifted to me, nothing else to disclose.


4 November 2015

'Ard As Nails - Blaze

I recently discovered Ard As Nails on Google+, so I started looking around for reviews and selected a couple of nail polishes that I wanted to try. Ard As Nails is an Indie (Handmade) Nail Varnish range created by the makers of Soap-Dodger. Their nail polishes are all 5 free, cruelty free and Vegan friendly.

I started chatting to Kat the woman behind it all, and I instantly fell in love with her. Her passion shines through her work, and customer service. So when I finally got my order placed I was very excited to try them out.

Today I have for you Ard As Nails - Blaze, a polish in The Medal Collection.
At the time of writing it is currently not available in the shop.

'Ard As Nails - The Medal Collection - Blaze

'Ard As Nails - The Medal Collection - Blaze


Shown on the pictures are three coats of polish, you could get away with two coats, but I am terrible afraid of VNL (Visible Nail Lines), so I added a third coat to be safe. The first picture shows the polish in natural light, there is a subtle holographic shine to it. When placing my hand in the lightbox with artificial light you can see the holoness a lot better, direct sunlight does that same.

I really like this bronze shade, and love the added holoness to it, I think it makes it stand out from other polishes and makes it unique. Exactly what I was looking for. Uniqueness.

My collection of nail polish is just passing the 500 mark, and the last thing I want is to clip on another swatching stick of a polish looking the same as the others I have.


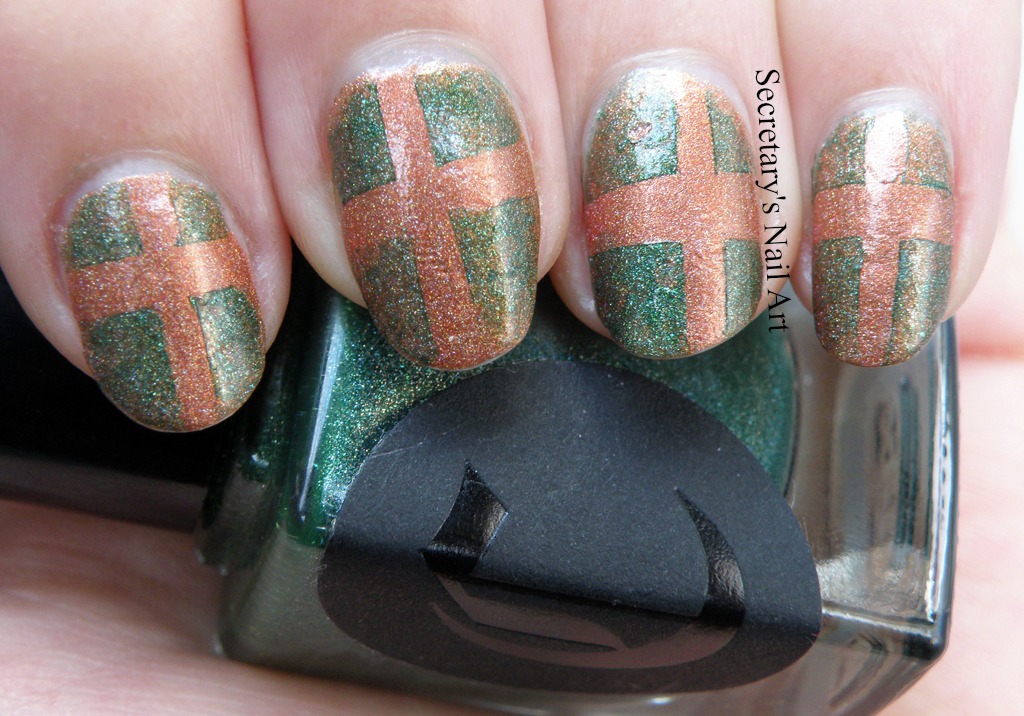
I wanted to do some nail art with this, and ended up placing some tape on my nails and sponge over using Cirque - Josephine. Cirque - Josephine is a gorgeous dark green holographic polish and I just love how those two look paired together.
Makes me wish I had tried to stamp or sponge a gradient with Cirque - Josephine instead.

'Ard As Nails - The Medal Collection - Blaze with Cirque - Josephine

I tried to change up how the crosses looks on my nails, almost like tiny presents waiting to be opened.

If you want to find out more about 'Ard As Nails, you can head over to Ard As Nails Facebook Page, or their shop Soap Dodger .


Feeling ready for Christmas just yet? I am almost done with all the presents, and the city is already filled with Christmas lights.